You are using an out of date browser. It may not display this or other websites correctly.
You should upgrade or use an alternative browser.
You should upgrade or use an alternative browser.
Savvy Mid Arm discussion
- Thread starter jampop1
- Start date
Florpro
Well-known member
Hey that looks familiar!jampop1 date=1461933601 said:I know it will work good
I have no idea what the pricing is yet, but you're closer than I've seen so far. The arms will be 2" 7075 for the lowers and 1.5" for the uppers.Jankoid date=1461787184 said:The longer arms will cost a good bit more as well. My custom 20" long (26" long with joints) 2" diameter 7075 aluminum control arms costed almost $100 each without joints. Add joints and that's $800 just for the lower arms. They'll probably be using 1.75" for the lowers and 1.5" for the uppers, but that's still a significant material cost increase over the short arms.
I'm guessing the kit will be around $2200.
To put it in perspective, there are 14 of the 2.5" Johnny Joints with Jam Nuts. That is 700 just in joints and nuts.
The rear truss is probably the single cheapest part and Rubicon Express has one similar for 125 so double that and then add another 100 for just the axle bits front and rear due to the front stiffener.
I know when I have done them for folks cobbling together parts from various vendors and building steel arms with weld in bungs, the cost of parts with my discount is almost 2000.00 in the box sitting in the driveway before I even touch them.
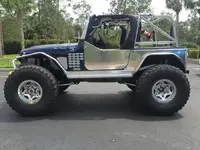
Hi Jamie! I'm assuming that's you since this is the first time I've seen a pic of your rig after countless phone conversations and with a username like jampop it can't be anyone else. So you can educate the class a bit, you can relate just how easy the install will be with pre made brackets that slap over the inside of the frame, get tapped into position off a center skid plate hole and then welded in place. 😉jampop1 date=1461933601 said:I know it will work good
To help you understand, this kit has all the changes made to it we went over endlessly on the phone so all the time you spent modifying the brackets is no longer needed.
Further, for those that say to just buy some builder brackets and slap it on yourself, that's a great way to go unless you are starting with a stock Rubicon. Then you have to completely slice and dice the front frame mounts to slide the lower outboard so the front driveshaft won't wipe itself out on the end of the bolt and the side of the bracket for the upper. Not to mention that NONE of them mimic a front parallel 4 link so it is very easy to wind up with a pull under hard braking due to not enough separation at the ends of the links.
Nice looking rig.
The kit is precisely that with a single exception. The 04-06 TJ Unlimited has a brace welded on top of the frame only on the drivers side near the front body mount that extends halfway down the inside of the frame. The C channel is cut off to fit below that so you have to clamp it in place where the rest slip over the frame from the inside and then get clamped to the frame. All the mounts are made to be slightly larger than the width of a JJ so the joints drop in easily without having the smack the mounts open. I despise mounts made the wrong width or too tight so that appeals to me a bunch.jeepster1407 date=1461843234 said:I couldn't agree more. If this kit has trusses and frame side brackets that are 100% self fixturing there is a ton of value here and they will sell like hot cakes...
Stretching the front is simple. Doing it is not hard, but time consuming. Simply cut the spring perches off the axle and get some builder perches from a JK front and center them on the axle tube. That gives you a bit over 1.5" of stretch right there. If you want more, take a look at your rig from the side and look at the coil spring. Notice that it is fairly straight up and down and if you move the lower perch while it is attached to the axle tube, you're going to have springs that lean back at the top or your moving upper spring perches. Also another way to find out who telling stories about how much they moved their front axle. If they tell you they have a 3" front stretch and the springs are straight up and down with stock upper perches, you may want to take a second look.Florpro date=1461902988 said:I think adding a small amount of wheelbase is key when going up in tire size... I'd like to figure out a "simple" way of stretching the front +/- 3" while retaining a highway friendly rig..
Is there enough now? If not, do you have a specific question that is tech related?LowJ date=1461805395 said:I beg to disagree but y'all can carry on.Where?
Mulvihill64
Well-known member
mrblaine said:Not to mention that NONE of them mimic a front parallel 4 link so it is very easy to wind up with a pull under hard braking due to not enough separation at the ends of the links.
Can you elaborate a little more on this? Is the difference here just the separation of the ends or is there more to it?
Florpro
Well-known member
Blaine,
Since you are here explaining things I have a few questions.
1. Will this kit work with the 3" Savvy springs? (I have them in a box waiting on trackbars and shocks at the moment) or 4" only? I want to know before I dump monies into something I won't be keeping.
2. What are the other suspension pieces needed to play nice with the Mid arm kit? Track bar, steering, etc..
3. Expound on the above comment about the front stretch... It is probably above my head but I will ask anyhow. Are you able to retain the stock steering box location and say a Currie steering setup and your flipped tierod while moving the front axle out a scosh?
Thanks 👍
The advantages of a parallel 4 link in the front are pretty basic but important. When you get you steering all dialed in, stuff stuffed in there so it all plays nice together without crashing into each other, a parallel 4 link maintains those relationships because there is minimal caster change throughout the range of motion of the suspension.Mulvihill64 date=1463540707 said:Can you elaborate a little more on this? Is the difference here just the separation of the ends or is there more to it?
If you try to move the lowers up too far on the axle tube in the name of clearance, you are sacrificing geometry unless you raise the upper link way up and that limits uptravel because the radiator, trackbar mount, etc are up there in the way. If you don't have enough separation, then they can't control the axle under hard braking and you get a pull to the passenger side.
1- yes, but why? The advantages of the mid arm will be compromised by the lower lift height and why spend the time and money solving the problems that the 3" short arm doesn't have?Florpro date=1463544531 said:Blaine,
Since you are here explaining things I have a few questions.
1. Will this kit work with the 3" Savvy springs? (I have them in a box waiting on trackbars and shocks at the moment) or 4" only? I want to know before I dump monies into something I won't be keeping.
2. What are the other suspension pieces needed to play nice with the Mid arm kit? Track bar, steering, etc..
3. Expound on the above comment about the front stretch... It is probably above my head but I will ask anyhow. Are you able to retain the stock steering box location and say a Currie steering setup and your flipped tierod while moving the front axle out a scosh?
Thanks 👍
2-Depends on what you have now. If you had a complete 4" Currie Short arm kit, you would need nothing but the kit and nothing would change except the links and mounts.
3- Yes, but again, you're solving a problem that doesn't exist. If you drive two identical rigs with the only difference being a front 2" stretch, they will handle, drive, and have the exact same offroad capability. I'm perfectly capable of designing and producing an elegant front spring perch and shock mount that would let you move the axle forward to center the perch on it and it's a poor product because it makes no difference.
Mulvihill64
Well-known member
mrblaine said:The advantages of a parallel 4 link in the front are pretty basic but important. When you get you steering all dialed in, stuff stuffed in there so it all plays nice together without crashing into each other, a parallel 4 link maintains those relationships because there is minimal caster change throughout the range of motion of the suspension.
If you try to move the lowers up too far on the axle tube in the name of clearance, you are sacrificing geometry unless you raise the upper link way up and that limits uptravel because the radiator, trackbar mount, etc are up there in the way. If you don't have enough separation, then they can't control the axle under hard braking and you get a pull to the passenger side.
So is the pull just due to caster change while braking? Or the passenger side of the axle actually shifting longitudinally due to braking forces?
Florpro
Well-known member
Thank you for responding on this.mrblaine date=1463545727 said:1- yes, but why? The advantages of the mid arm will be compromised by the lower lift height and why spend the time and money solving the problems that the 3" short arm doesn't have?
2-Depends on what you have now. If you had a complete 4" Currie Short arm kit, you would need nothing but the kit and nothing would change except the links and mounts.
3- Yes, but again, you're solving a problem that doesn't exist. If you drive two identical rigs with the only difference being a front 2" stretch, they will handle, drive, and have the exact same offroad capability. I'm perfectly capable of designing and producing an elegant front spring perch and shock mount that would let you move the axle forward to center the perch on it and it's a poor product because it makes no difference.
I am currently running stock springs and a 2" coil spacer, all 8 Savvy DA control arms, Savvy UA, and stock track bars/ Grand Cherokee tie rod on 33" tires.
I have new in box 3" Savvy/Currie springs taking up space in my garbage (lol auto correct)
I would like to eventually end up on 35-37" tires and a JK axle with a ~4" rear stretch and maybe a little up front with mid arms. (Insert LS/auto/Atlas somewhere in there)
Bottom line is this jeep was my late father-in-laws and I plan to keep it for as long as I can afford to and I want to build it well; and once. I know what my end goal is and I would like to make additions that will stay, instead of being swapped out.
My jeep NEEDS to be very street worthy, but able to tackle trails that your average JK will shy away from. My whole goal with my jeep is to drive to the trail, wheel, and drive home, safely and comfortably. The last bit may be a stretch as it is a Jeep, but you get the gist... I've done the trailer queen thing and now I want a very versatile vehicle. Btw I live in AZ so go fast desert is part of the mix, as well as some larger rocks, and some scenic stuff thrown in the mix too.
I have learned after building many rigs and styles of rigs that if you build it to handle and drive well on the street, it has no problems offroad. The mid arm done right, is really the best of both worlds. It has none of quirks of a short arm kit, and none of the disadvantages of a long arm kit.Florpro date=1463548145 said:My jeep NEEDS to be very street worthy, but able to tackle trails that your average JK will shy away from. My whole goal with my jeep is to drive to the trail, wheel, and drive home, safely and comfortably. The last bit may be a stretch as it is a Jeep, but you get the gist... I've done the trailer queen thing and now I want a very versatile vehicle. Btw I live in AZ so go fast desert is part of the mix, as well as some larger rocks, and some scenic stuff thrown in the mix too.
That said, one of my favorite anticipations when the kit is released is going to be watching the anti body lift guys stomp their feet and snivel while they figure out how to modify it and screw up the geometry to install the kit without a body lift.
Shifting. It is all about leverage and another aspect often overlooked by builders is just how much small vertical separations at link ends stresses the mounts and the joints. Ever wonder why RE has such a problem keeping their joints alive? It is more related to how close together they are at the belly skid than the quality of the joint.Mulvihill64 date=1463546903 said:So is the pull just due to caster change while braking? Or the passenger side of the axle actually shifting longitudinally due to braking forces?
jampop1
Well-known member
mrblaine said:Hi Jamie! I'm assuming that's you since this is the first time I've seen a pic of your rig after countless phone conversations and with a username like jampop it can't be anyone else. So you can educate the class a bit, you can relate just how easy the install will be with pre made brackets that slap over the inside of the frame, get tapped into position off a center skid plate hole and then welded in place. 😉
To help you understand, this kit has all the changes made to it we went over endlessly on the phone so all the time you spent modifying the brackets is no longer needed.
Further, for those that say to just buy some builder brackets and slap it on yourself, that's a great way to go unless you are starting with a stock Rubicon. Then you have to completely slice and dice the front frame mounts to slide the lower outboard so the front driveshaft won't wipe itself out on the end of the bolt and the side of the bracket for the upper. Not to mention that NONE of them mimic a front parallel 4 link so it is very easy to wind up with a pull under hard braking due to not enough separation at the ends of the links.
Nice looking rig.
Hello Mr. Blaine yes it is I. I would like to just say thank you for all the help that you have given me with this build. It would not look or perform the way it does if I had not had your help.
I am sure that this kit is probably going to cut the install time almost in half. It takes me about 25 hours to install a 3 link mid-arm with builders brackets, fixing all the mounts so the driveshaft doesn't hit the bolt for the Johning Joints, lining the Johnny Joints up properly after cutting the mounts apart along with making the upper control arm mount. This time does not include adding a truss.The pre made brackets are going to be a dream to install.
The way this set up performes, I have no problems with braking or handling. Off-road it just works, I am in one wheel drive when all the other rigs are in four-wheel-drive trying to climb the exact same obstacle.

Yep, it's always a challenge trying to get folks to understand just how much better they work and handle offroad when all the "commonly accepted conventional things" haven't been done like raising the lowers, extending the wheelbase unnecessarily, etc. Listening to how much you enjoy the way it works is very good to hear.jampop1 date=1463608655 said:Hello Mr. Blaine yes it is I. I would like to just say thank you for all the help that you have given me with this build. It would not look or perform the way it does if I had not had your help.
I am sure that this kit is probably going to cut the install time almost in half. It takes me about 25 hours to install a 3 link mid-arm with builders brackets, fixing all the mounts so the driveshaft doesn't hit the bolt for the Johning Joints, lining the Johnny Joints up properly after cutting the mounts apart along with making the upper control arm mount. This time does not include adding a truss.The pre made brackets are going to be a dream to install.
The way this set up performes, I have no problems with braking or handling. Off-road it just works, I am in one wheel drive when all the other rigs are in four-wheel-drive trying to climb the exact same obstacle.
NOTICE: This thread seems to have misplaced itself for one reason or another; I'm honestly not sure how it wound up in the Recycled section but it's now been restored to General Chit-Chat. We apologize for the inconvenience, and we'll try and figure out what happened. Thanks to all that have posted; keep the good information coming. 👍
357transam
Well-known member
jampop1 said:I am sure that this kit is probably going to cut the install time almost in half. It takes me about 25 hours to install a 3 link
Not only will it cut YOUR time in half, but for someone like me who hasn't done this before, this kit would cut days out of the time I'm sure. I feel that this is a great option for someone that has decent fab abilities, but doesn't really have the knowledge or experience to properly put together a suspension like this on the first try. I think it fills a need quite nicely.
